

Editors expected a Final Cut Pro 8. There had been little reason to expect that Apple would radically and fundamentally change its flagship professional editing program. Editors expected the same software, only better.
Then Apple decided to re-write the code from scratch. In doing so, it decided to take its NLE in a vastly new direction.
What follows is what I think are some of the key differences between Final Cut Pro X and Final Cut Pro 7. These aren't the only differences between the programs that one could list. Also, there are lots of features that were not a part of X when it was first released that have since been added back or updated. The differences I'm going to cover are more fundamental and will always be what separates X from its forebear.
Why make a compare/contrast list two and a half years after X's release? Because not every FCP7 editor has decided whether to add X to their utility belt, let alone try X at all. There may be some who are still curious about how different X is, and there may even be more who sat down for five minutes with it who don't know what the F is going on.
The Interface
Let's start with the obvious and superficial. When you launch Final Cut Pro 7, you get this:
 |
| FCP7 interface for the last decade |
Your sequence/timeline is where you make your string-outs, your assemblies, your rough cuts. This timeline has tracks (up to 99 for both video or audio) and video is always, ALWAYS above audio.
 |
| FCP7 sequence - Tracks! |
Beyond these basic windows common to most NLEs, there is an audio mixing board, video scopes, you can manipulate scale and distort your image right in the Canvas. Sequence settings, scratch disks, effects, window layouts and many other options/tools are accessible via the menu bar at the top of the screen.
It's an intuitve interface. You don't have to switch in and out of different modes like you do in Avid in order to physically manipulate your footage; you can grab anything in the timeline and move it. It's a very powerful program with lots of depth.
Launch Final Cut Pro X and you get this:
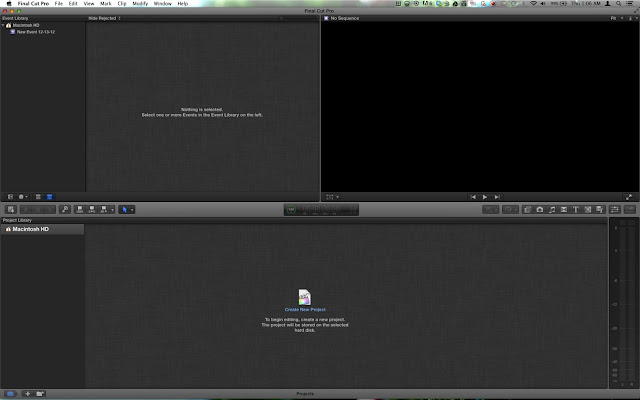 |
| FCPX interface for the next decade |
Which on first glance make many editors think of this:
 |
| iMovie. Oh no! |
Which in turn makes editors do this (imagine, if you will, the editor is played by the man in the chair while Apple is played by the creepy intense Michael Ironside):
FCPX's interface is a major overhaul. The windows remain firmly in place. Its menu bar at is rather simplified compared to FCP7. So are the features you can access. It trades customization and flexibility for simplicity which makes it look like the program lacks depth. (Spoiler alert: it doesn't.)
Your media still lives in the Browser, but the Browser no longer presents the media of a given Project. Instead, the Browser shows you the media within a given Event (the almost-equivalent to a FCP7 Project). Instead of organizing media by physically moving clips into separate bins, you tag clips to filter media within a given Event. Keywords and Smart Collections help you filter footage based on specific parameters.
Upon initial release, X did without a source/record monitor setup. There was only one viewer with which to view media (Apple has since added a second viewer).
Below the browser sits the Magnetic Timeline. The Magnetic Timeline does away with tracks. Where a traditional NLE has separate tracks for video and audio, X bundles video and audio together by default (similar to a Nested Sequence in FCP7). Editing is based on a Primary/Secondary Storyline paradigm. Your A Roll goes into your primary storyline; your B Roll is then connected to that primary storyline (hmm... sounds a lot like working on a flatbed all of a sudden, doesn't it? Maybe X hasn't totally abandoned the past...). More on all this later, but that's how it works in a nutshell.
Effects, titles, generators and your iTunes & iPhoto libraries (I know, I know - how consumer-y, said the Snobby Pro) are now accessible via panels above timeline that you open and close when needed.
| Effects Pane: Looks like a child's toy computer |
X includes other important windows that are not open when you first begin the program but offer additional information. I'll go into these details into future posts, but I'll say this much: I keep my Inspector and Timeline Index open pretty regularly.
For all you visual learners out there, here's a video that covers the interface:
Apple adopted the Skimmer from iMovie and brought this feature to X. It allows you to skim across your footage quicker than if you jogged through your footage using J, K, L keys - though you can still do that and I use JKL everyday. At first I found the Skimmer annoying. Occaisonally I still do. But most of the time I love it. Learn to love your skimmer:
What did pros hate about the revamped interface? EVERYTHING.
Projects
 |
| FCP7 - Lots of bins, lots of sequences |
Project files are easy to share with other editors who have a backup copy of the footage. Wherever your project file went, so needed to follow your media, but you could easily save a project file to a jump drive or email it to a collaborator.
FCPX no longer packages your work in a single project file. Instead, your work is housed within the application itself. It is now a true database, so everything is saved in one place.
As mentioned, when you begin a new movie, you import your footage into an Event. All Events are stored in the Event Library. You do all your organizing and your logging in this Event. You can even (and should) begin editing within the Event itself using Favorites. When you are ready to make edits in a timeline, that's when FCPX is ready for you to begin a "Project."
Projects in X are now your Timelines (or what used to be Sequences in FCP7). Projects can have a default Event tied to them, but you could add media from any event to a single project. Projects (again, technically, Timelines) live in their own space separate from events in what's called the Project Library.
You can duplicate these Projects to create versions of your edits, and you can organize these Projects using folders. But opening an Event does not automatically lead you to your Project the same way opening an FCP7 project leads you to your sequence.
Confused? So were most people the day FCPX was released. (Again, you access Projects (aka: Timelines) separately via the Project Library.
 |
| Libraries (FCPX) vs. Files (FCP7) |
What did pros hate about this? If they understood it, they hated it. If they didn't understand it, they hated Apple for hurting their brains. The nomenclature got screwed up and it causes you to think differently about how your entire movie is set up.
It's confusing for sure. I would have dropped the term "Project" and instead stuck with "Timeline." The term "Project" was too closely tied to the old paradigm.
Saving and Backups

FCP7 comes with an Auto Save feature that backs up additional copies of your project files at set intervals. In User Preferences you set where these Auto Save files are located on your local or external disk as well as how often a backup is made.
For example, you can set your project file to automatically be saved every ten minutes. That way if you forget to save manually, at least FCP7 will save for you often enough you don't have to worry as much about forgetting to save. But if you have a very large project, it will take a while to save this back up at each interval, and you will have to stop what you're working on and wait while it saves.
For example, you can set your project file to automatically be saved every ten minutes. That way if you forget to save manually, at least FCP7 will save for you often enough you don't have to worry as much about forgetting to save. But if you have a very large project, it will take a while to save this back up at each interval, and you will have to stop what you're working on and wait while it saves.
If your project crashes mid-edit, you have to rely on the latest Auto Save project to restore your work. Sometimes, if a crash happens before the next scheduled Auto Save, you'll find you can't get all of it back.
FCPX, on the other hand, constantly saves in the background. There's no Auto Save anymore since there's no project files for you to periodically back up. X is a database that is constantly being updated rather than saved, in the classic sense. So now there's no more worrying about saving periodically (which does take some getting used to.)
 |
| More iMovie Mods |
But if the disk your saving to goes down, how would you be able to reconstruct your database which contains all your metadata, log notes, and edits? This is actually one area where - while it's really nice your work is being constantly backed up in the background - you have to turn to a third party application for another level of security.
What did pros hate about this? They liked the fact FCPX was always saving. One less thing to worry about. But I've talked to editors who have stated that a lack of ability to save a backup of the FCPX file structure in a place separate from its main database is stored is a deal breaker for them. I understand and agree... which is why we'll discuss solutions to this issue in a future post.
Rendering
In order to watch any complex effects, heavy use of filters, or multiple video layers, you typically have to render your timeline. In FCP7, rendering would cause you to stop what you were doing and wait for the render to finish. Real time renders were introduced, but this gives you a lower quality preview that you will still have to render in full at some point.
FCPX renders in the background. If something in your timeline needs rendering you will see an orange line above the clip or group of clips. If Background Rendering is checked on in Preferences, whenever your mouse sits idle or you are completing a simple task, FCPX will render automatically so you can continue to work.
Rendering
 |
| Not long enough to procrastinate, too short to remain patient |
In order to watch any complex effects, heavy use of filters, or multiple video layers, you typically have to render your timeline. In FCP7, rendering would cause you to stop what you were doing and wait for the render to finish. Real time renders were introduced, but this gives you a lower quality preview that you will still have to render in full at some point.
FCPX renders in the background. If something in your timeline needs rendering you will see an orange line above the clip or group of clips. If Background Rendering is checked on in Preferences, whenever your mouse sits idle or you are completing a simple task, FCPX will render automatically so you can continue to work.
 |
| Tasks get done so fast it's hard to get a snapshot to prove it |
What did pros hate about this? Nothing at first - until they noticed how quickly their drives could suddenly fill up with render files. Then it became more of a burden than an asset. But as always, there is a way of dealing with side effects of this and most features in FCPX that aren't necessarily clear at first.
There was one group - mostly made up of high school and college students - that was hurt hardest by Background Rendering. Editors could no longer hit render just to tell their director, "I'll get to your notes right away... as soon as this render is finished. Lots of layers, lotta ins, lotta outs. In the meantime, wanna watch last night's Daily Show?"
There was one group - mostly made up of high school and college students - that was hurt hardest by Background Rendering. Editors could no longer hit render just to tell their director, "I'll get to your notes right away... as soon as this render is finished. Lots of layers, lotta ins, lotta outs. In the meantime, wanna watch last night's Daily Show?"
No comments:
Post a Comment